Using the Expression Editor
- About the Expression Editor
- Expression Editor Features
- Accessing the Expression Editor
- Using the Expression Editor
- Using the Simplified Expression Editor
- Using Comments in Expressions
About the Expression Editor
Use the Expression Editor to construct expressions, to create or edit rules (for example, an initialization, editing, calculation, read-only, required, or before-save rule), and as a tool in creating and editing quick actions.
Expression Editor
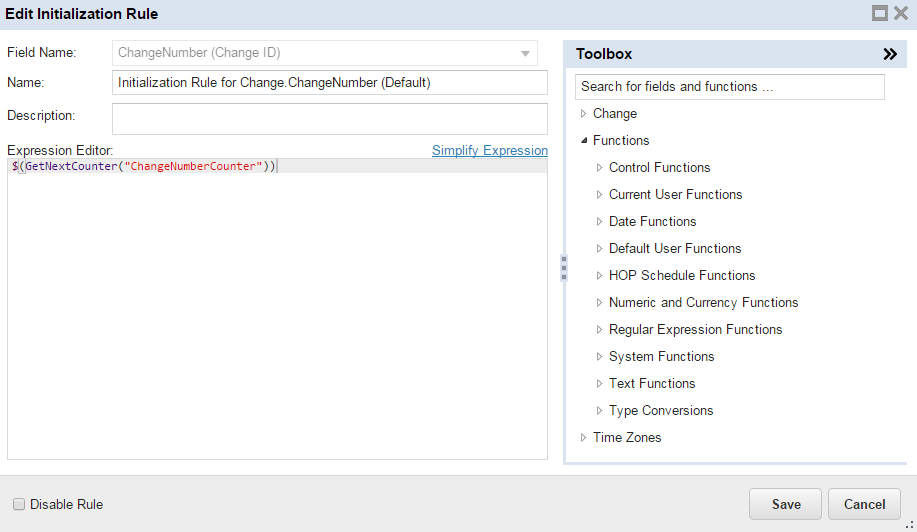
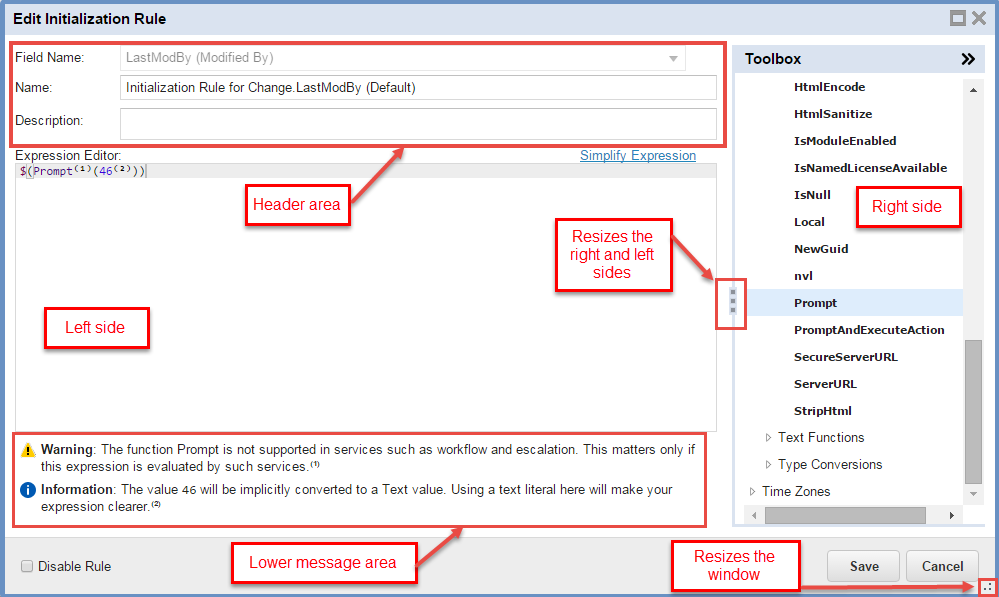
The Expression Editor has five parts: the , the left side where you enter syntax, the lower message area, and the right side where you select fields, functions, and time zones.
- Header area: Enter a field name, rule name, and rule description. You can also elect to simplify the expression.
- Upper message area: Watch for errors, warnings, or informational messages about your expression. It shows any of the following messages:
- "Please correct the errors in your expression and try the save again."
- "Your expression has warnings. If you click Save again, your expression will be saved but may not function correctly. We recommend that you address the warnings before saving."
- "Your expression has no warnings or errors, but there are some informational messages that suggest how to check or improve or check your expression. If you click Save again, your expression will be saved and will function correctly."
- Left side: Enter syntax for the expression.
- Lower message area: Watch for errors, warnings, and informational messages about your expression.
- Right side: You can select fields, relationships, functions, time zones, and more. The available selections depend on the business object. To select an item, highlight it and double click. The application adds the correct syntax for that item to the left side.
- Make the Expression Editor larger by dragging the control on the bottom right corner or resize the left and right sides.
Parts of the Expression Editor
Expression Editor Features
- Color Coding in the Expression Editor
- Typing Ahead in the Expression Editor
- Showing Display Names
- Using Code Snippets
- Simplifying Expressions
- Using the Expression Validator
Color Coding in the Expression Editor
The Expression Editor uses color coding help visualize the structure of your expression. These colors are fixed and cannot be customized.
| Construct | Keywords | Current Color |
|---|---|---|
| Operator | * - + / $ | & | #C800A4 -- sample |
| Left paren | ( ) | black |
| Keyword | if, then, else, original, current, language, where, outer, object, fold, map, all, none, any, each | #C800A4 -- sample |
| Constant | null | #C800A4 -- sample |
| Punctuation | . , | black |
| Numeric | numbers | #3A00DC -- sample |
| String | strings | #DF0002 -- sample |
| Function | functions and fields from business objects | #450084 -- sample |
| Designator | other object, validation list, matched object, this#form, top, parent, link, join | black |
|
Comment |
// /* */ |
green |
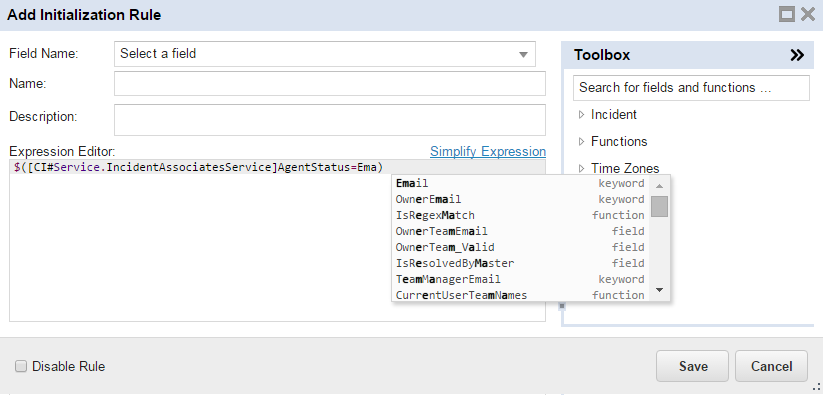
Typing Ahead in the Expression Editor
When you enter an expression directly into the left side of the Expression Editor, the application provides hints based on what you enter. For example, if you know that you want to enter something about email, type email, and the application displays a list of all the field names, functions, and keywords that have email in them.
Expression Editor Displaying Hints
Showing Display Names
The application shows both the business object name and the display name for items on the right side of the Expression Editor, but only if the display name is different than the business object name. The display name is shown in parentheses. You can also search by both business object name and display name.
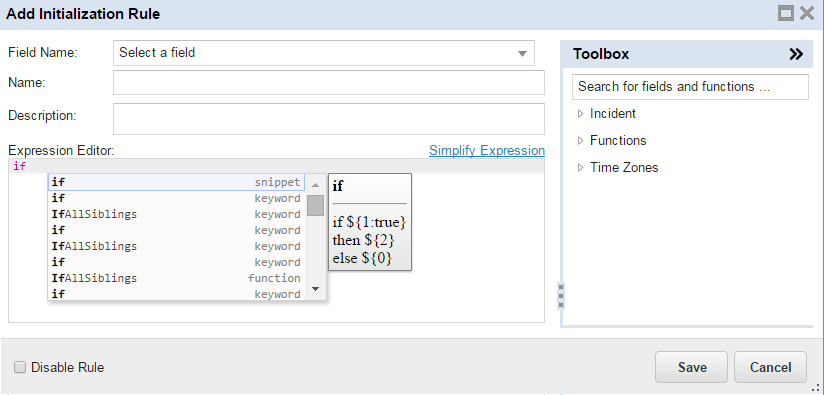
Using Code Snippets
You can add predefined snippets to an expression. On the left side, start typing and the application displays a list of all the snippets, keywords, functions, and fields with the text that you entered.
Adding a Snippet in the Expression Editor
Simplifying Expressions
- About Simplifying Expressions
- Boolean Simplification
- Conditional Simplification
- Inserting Conversion Operators
About Simplifying Expressions
You can simplify expressions. The simplify feature works for all expression types, such as Boolean, DateTime, text, integer, etc. It mostly handles Boolean expressions, replacing one expression by another that is equivalent, but simpler. The simplify feature also replaces some implicit conversion with explicit conversions, which can make the expression longer but makes it simpler.
Boolean Simplification
In the following examples, e is a Boolean expression. If e is another type of expression that can be implicitly converted to e, then the result is the converted value, not the original e.
Boolean Operations with Constants
$(e and true) => $(e)
$(e and false) => $(false)
Removing "Not"
$(not not e) => $(e)
$(not true) => $(false)
Equality and Inequality
$(true == e) => $(e)
$(e == false) => $(not e)
DeMorgan's Rules
$(not (e1 and e2)) => $(not e1 or not e2)
$(not (e1 or e2)) => $(not e1 and not e2)
Relational Inversion
In this section, a and b are two comparable values, not necessarily Booleans. However the result of comparing them via a relational value is always Boolean and therefore this section is included with the Boolean simplifications.
$(not (a <= b)) => $(a > b)
$(not (a in (v1, v2,...)) => $(a not in (v1,v2,...))
Conditional Simplification
In this section, e is a Boolean expression and a and b are two expressions of the same type.
$(if a > 0 then true else false) => $(a > 0)
$(if e then false else true) => $(not e)
If e1 and e2 are Boolean expressions, then:
$(if e1 then e2 else false) => $(e1 and e2)
Inserting Conversion Operators
The simplify feature does not insert an explicit conversion of any type to text. However, using other conversion operators makes the intent clearer. For example:
$(if 5 then a else b) => $(if Boolean(5) then a else b)
$(true + 10) => $(Number(true) + 10)
Using the Expression Validator
About the Expression Validator
The expression validator provides informational messages about the correctness of expressions. The expression validator is used everywhere to validate the expressions where ever they are used and is a part of the metadata validator, described in Working with Metadata.
The expression validator validates business rules, quick actions, data segregation, form expressions, and control expressions. It does not perform detailed validations for LDAP, request offerings, pick lists, or relationship expressions.
The expression validator checks the semantics of the expression, such as ensuring the following:
- Neurons for ITSM function names refer to functions that exist.
- The field names are correct and refer to existing fields.
- The types of expressions (such as Boolean, text, etc.) are correct.
The parser checks the syntax and figures out the structure of the expression, such as ensuring that:
- Parentheses match.
- All statements are correct, for example making sure that "if" statements have a "then" and "else".
- Operators are used properly.
Expression Validator Error Messages
The expression validator provides informational messages and suggestions about expression semantics. For example, if you enter something incorrectly into the Expression Editor, (such as misspelling an expression name), the expression validator returns a warning or error message and provides a hint about the problem.
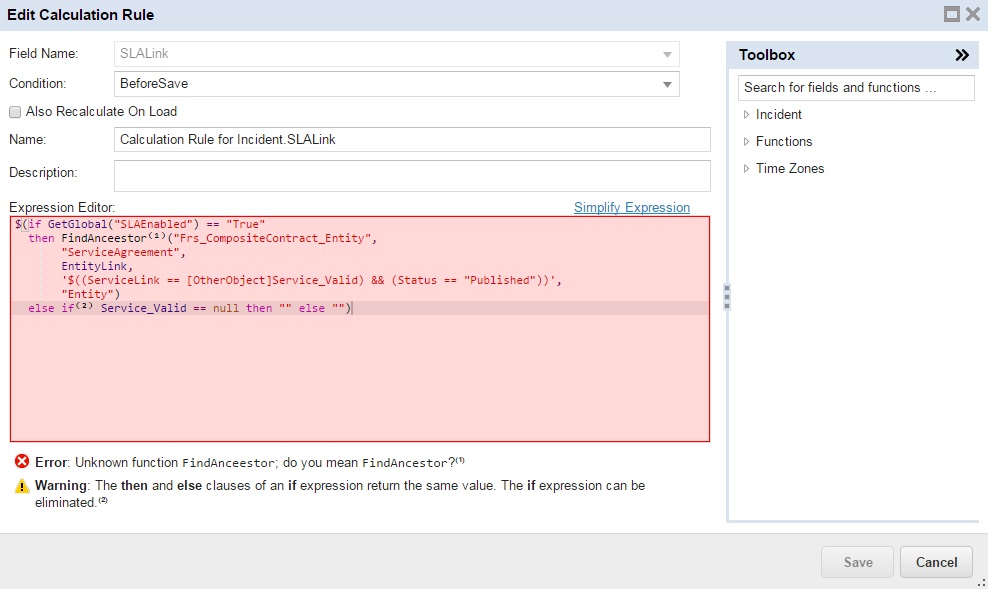
In the following example, the name of the built-in function FindAncestor is misspelled. The expression validator provides an informational error message and does not allow you to save the expression and may also give you a suggestion about which function to use.
Expression Editor Validation Message Example 1
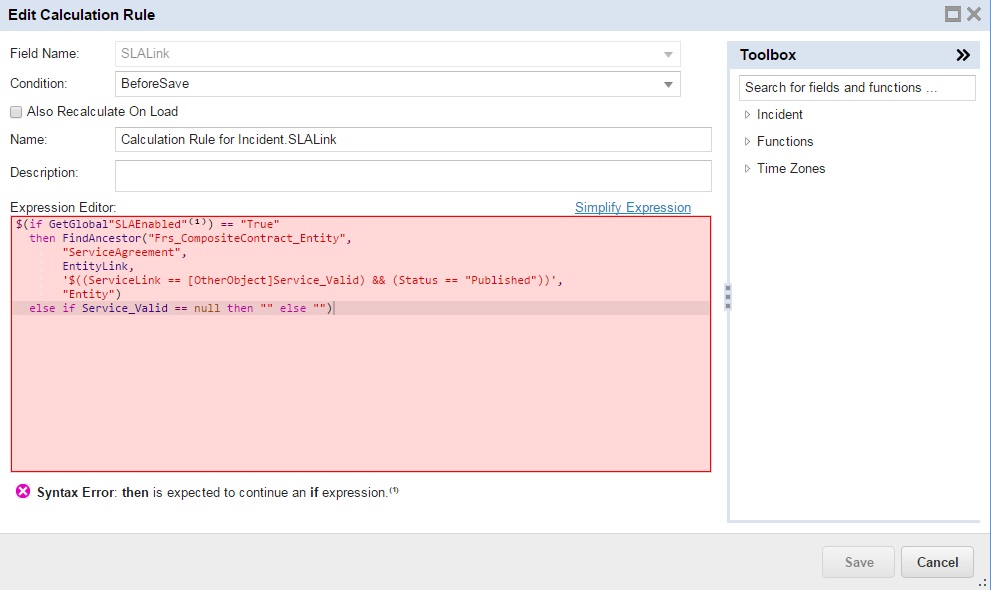
In this example, the expression validator displays an error message:
Expression Editor Validation Message Example 2
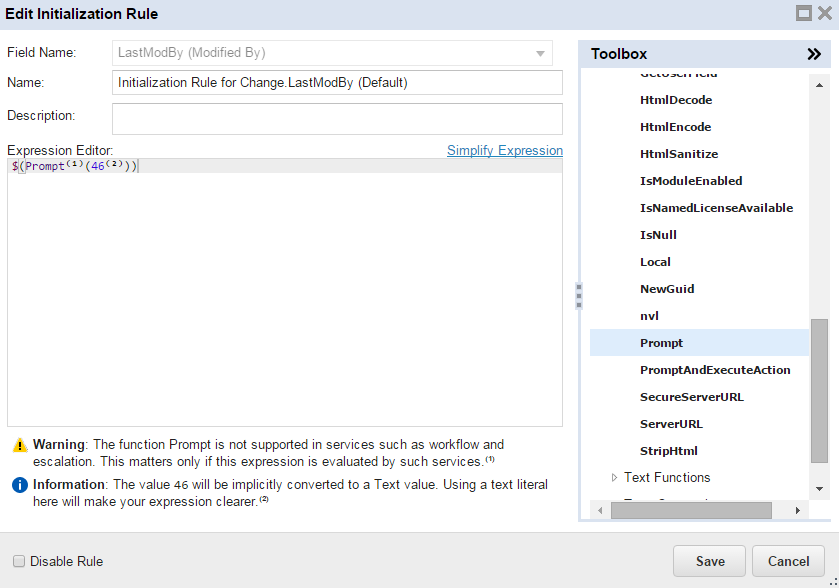
The Expression Editor displays a superscript number next to an error if there are multiple errors, to make it easier to identify which error goes with which error message. The Expression Editor also provides information about misspelled validation list values, identifies keywords, and displays helper text that gives alternatives.
Expression Editor Validation Message Example 3
Accessing the Expression Editor
You can access the Expression Editor in different ways, depending on the business object type.
- Accessing the Expression Editor from the Configuration Console
- Accessing the Expression Editor from a Business Rule
- Accessing the Expression Editor from a Quick Action
- Accessing the Expression Editor from a Saved Search
Accessing the Expression Editor from the Configuration Console
There are several ways to access the Expression Editor in the Configuration Console.
- Business Object workspace > Relationships tab > open a relationship > Relationship Details section > Condition field
- Business Object workspace > Forms tab > open a form > Control Properties tab
- Business Object workspace > Lists tab > open a list > click List Properties > open Style drop-down list
- Business Object workspace > Layouts tab > open a layout > click formView > click Hidden Expression, Link Button Filter, List Filter, or Initially Visible
- Business Object workspace > Workflows tab > open a workflow > click the edit icon
 > Insert Child Object, Insert Multi Child, Update blocks
 - Pick Lists workspace > open a pick list > add a constraint
- Automation Tools > Object Matching Lists workspace > open an object matching > click Edit Filter > Condition field
- Automation Tools > Object Matching Lists workspace > open an object matching > click Edit Preview > click Edit Filter > Condition field
- Automation Tools > Watch Lists workspace > open a watch list
- Mobile Layouts workspace > open a layout > click Customize Detail View > add or edit a field
- User Interface Styles > Calendars workspace > click Change Calendar > Multi-Day Title Expression or Single-Day Title Expression fields
- Users and Permissions > Roles and Permissions workspace > open a role > Object Permissions tab > select a business object > click Edit under Access > click Add a new case....
- Dashboards workspace > open a dashboard > Tree Parts section > Node Properties section
- Dashboards workspace > open a dashboard > Pivot Tables section > Filters tab
Accessing the Expression Editor from a Business Rule
- In the Configuration Console, click Build > Business Objects to open the Business Objects workspace.
- Open a business object.
- Click the Business Rules tab.
- To add a new business rule, expand the section for a business rule and click Add <type of rule> Rule. For example, to add an initialization rule, click Add Initialization Rule. The application displays the Add <type of rule> Rule dialog box, including the Expression Editor.
- To edit an existing business rule, click the edit icon . The application displays the Edit Business Rule dialog box, including the Expression Editor.
Accessing the Expression Editor from a Quick Action
- Log into the Service Desk Console.
- Click Incident to open the Incident workspace.
- Click Action Menu > Edit Actions. The application displays the Action Designer.
- Select any action that updates values.
- Click Edit.
- To edit a field value, click the edit expression icon
 . The application displays the Expression Editor.
Accessing the Expression Editor from a Saved Search
- Log into the Service Desk Console.
- Open a workspace.
- Click the down arrow next to the word All to open the Saved Searches menu for that workspace.
- Click the edit icon to edit a saved search.
Using the Expression Editor
- Access the Expression Editor. See Accessing the Expression Editor.
- In the Expression Editor, enter an expression or drag a function from the Functions drop-down list to the Expression Editor.
- Click Save.
Using Comments in Expressions
Add comments to your expression code, or comment out code in the Expression Editor and in the Simplified Expression Editor. The following rules appy to comments when entered into an expression:
•When characters '//' are entered into an expression, all expression syntax entered from that point to the end of the line is classed as a comment.
•When characters '/*' are entered into an expression, all expression syntax entered from that point to a closing '*/' is classed as a comment. If no closing '*/' is found, all expression syntax up to the end of the expression is classed as a comment.
•Comments are highlighted in green text.
•Multiple comments are permitted within an expression.
•If you select Simplify Expression, any comments added to your expression may be removed. This depends on whether the expression can be simplified or not.
See Using Multiple Lines and Tab Spaces in Expressions for information on adding multiple lines and tab spaces in your expressions.